Best Export Settings in KineMaster for High-Quality Videos
April 6, 2025 (4 months ago)

Creating professional and high-quality videos is now easier than ever with the help of video editing apps like KineMaster. Whether you’re a beginner or an experienced video editor, having the correct export settings is essential to produce videos that look sharp and professional. KineMaster provides various options that you can customize to achieve the best results for your content. In this article, we’ll explore the best export settings for high-quality videos on KineMaster and explain each step in simple terms.
Why Export Settings Are Important
When you edit a video, you spend a lot of time adding effects, transitions, music, and other elements. However, if you don’t use the right export settings, the final result may not look as good as you want. Poor export settings can lead to problems like:
- Low video resolution.
- Grainy or pixelated images.
- Incompatible file formats for your target audience or platform.
The right settings ensure your video maintains its quality and plays smoothly on different devices or platforms. Let’s dive into the essential export settings in KineMaster.
Step-by-Step Guide to Export High-Quality Videos
Here is a detailed guide to help you choose the best export settings in KineMaster.
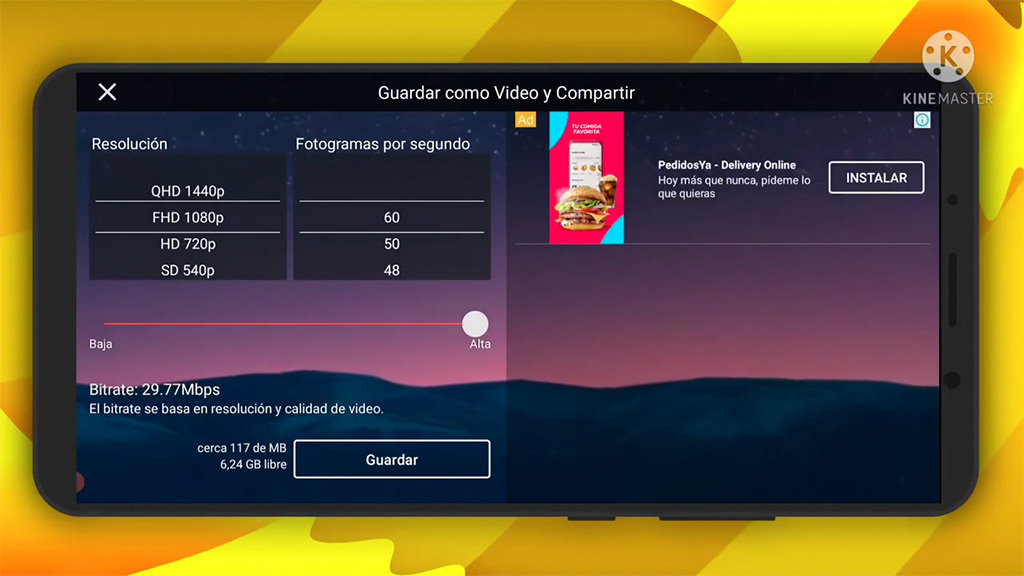
1. Select the Right Resolution
Resolution determines the clarity and sharpness of your video. The higher the resolution, the better the video quality. However, higher resolutions also mean larger file sizes. In KineMaster, you can select from different resolutions, including:
- 720p (HD): Suitable for videos intended for social media platforms like Facebook and Instagram.
- 1080p (Full HD): Ideal for YouTube videos and professional projects.
- 4K (Ultra HD): Best for very high-quality videos, such as documentaries or cinematic content.
Recommendation: For most projects, 1080p (Full HD) is the best choice as it balances quality and file size.
2. Choose the Correct Frame Rate
The frame rate refers to the number of frames (images) shown per second in your video. A higher frame rate results in smoother motion but increases the file size. KineMaster offers options such as:
- 24 fps (frames per second): Used for cinematic looks.
- 30 fps: Common for YouTube, Facebook, and Instagram.
- 60 fps: Best for fast-moving content, like sports or gaming videos.
Recommendation: Use 30 fps for regular videos and 60 fps for action-packed content.
3. Adjust the Bitrate
The bitrate controls the amount of data processed per second in your video. Higher bitrates produce better quality, but the file size increases. KineMaster allows you to adjust the bitrate when exporting. If your goal is high-quality videos:
- Select 10 Mbps to 16 Mbps for Full HD (1080p).
- For 4K, you can increase the bitrate to 50 Mbps or more.
Recommendation: A bitrate of 10 Mbps works well for most HD videos.
4. Select the Proper File Format
The file format decides how your video is stored and shared. KineMaster supports multiple formats, but the most common ones are:
- MP4 (H.264 codec): Widely compatible with most devices and platforms. This is the best option for general use.
- MOV: Useful for professional workflows but might have limited compatibility on some platforms.
Recommendation: Stick with MP4 (H.264 codec) for maximum compatibility.
Steps to Export Your Video in KineMaster
Once you’ve finished editing your video, follow these steps to export it using the best settings:
- Tap the Export Button: After completing your video project, tap the export button (usually a symbol of an arrow pointing upward or outward).
- Select Resolution: Choose the resolution, such as 720p, 1080p, or 4K.
- Adjust Frame Rate: Pick the appropriate frame rate (24 fps, 30 fps, or 60 fps).
- Set Bitrate: If available, manually adjust the bitrate for the highest quality.
- Choose File Format: Select MP4 as the export format.
- Start Exporting: Tap the export button to start the process. KineMaster will process the video and save it to your device.
Additional Tips for High-Quality Exports
To ensure the best results, keep these tips in mind:
- Edit with High-Quality Media: Start with high-resolution images and videos. You can’t expect a low-quality clip to look good even with the best export settings.
- Optimize for Platform Requirements: Different platforms have different requirements. For example:
- YouTube: Use 1080p or 4K with a bitrate of at least 10 Mbps.
- Instagram: Opt for 1080p at 30 fps with a 1:1 (square) or 9:16 (vertical) aspect ratio.
- Enable Hardware Acceleration: If your device supports it, enable hardware acceleration in KineMaster for faster exporting.
- Test Before Final Export: Export a short clip first to check the quality before processing the full video.
Troubleshooting Common Issues
Sometimes, you may face issues during exporting. Here’s how to solve them:
- Low-Quality Output:
- Check your resolution, frame rate, and bitrate settings.
- Avoid compressing the video too much.
- Large File Size:
- Reduce the resolution (e.g., from 4K to 1080p).
- Lower the bitrate slightly.
- Export Errors:
- Free up storage space on your device.
- Close other apps running in the background.
Conclusion
Exporting high-quality videos in KineMaster is simple if you understand the right settings. By carefully choosing the resolution, frame rate, bitrate, and file format, you can produce professional-looking videos that meet the needs of your audience. Whether you’re creating videos for YouTube, Instagram, or personal use, these settings will help you get the best results.
Recommended For You