How to Use Kinemaster on iOS for Pro Photo Editing
April 6, 2025 (4 months ago)
Kinemaster is one of the most popular video editing apps available for both iOS and Android devices. It allows users to create high-quality videos with professional features right from their smartphones or tablets. Whether you’re a beginner looking to edit simple clips or a pro aiming to produce high-quality content, Kinemaster provides all the tools you need for video editing on the go. This article will guide you through the key features and steps to use Kinemaster on iOS for pro editing.
What is Kinemaster?
Kinemaster is a full-featured video editing app that gives users the power to create professional-looking videos from their mobile devices. It offers a range of features like multiple video and audio layers, effects, transitions, and the ability to apply precise editing techniques. It’s perfect for YouTubers, content creators, and social media influencers who need to create stunning videos directly from their smartphones or tablets.
Why Choose Kinemaster for Pro Editing on iOS?
Kinemaster is a great choice for pro editing on iOS because it offers powerful features in an easy-to-use app. It lets you edit videos with multiple layers of video, audio, and effects, making your projects more creative and professional. Kinemaster also provides tools for trimming, splitting, and adding text, transitions, and animations to your videos. You can apply filters, color corrections, and use green screen effects to enhance your content.
- Setting Up Kinemaster: To set up Kinemaster on your iOS device, start by downloading the app from the App Store. After installation, open Kinemaster and sign in or create an account if you don’t already have one.
- Creating Your First Project: Creating your first project in Kinemaster is simple. Open the app, then tap the “+” button to create a new project. Choose the aspect ratio for your video, like 16:9 for YouTube or 1:1 for Instagram.
- Using Multiple Layers: Kinemaster allows you to work with multiple layers of video, audio, and effects. To add a video layer, tap the “Layer” button, then choose “Video.” Select the clip you want and drag it onto the timeline.
- Trimming and Splitting Video: Trimming and splitting videos are essential for removing unwanted parts of your clips. To trim a clip, tap on it in the timeline and drag the edges inward to shorten it.
- Add Text and Titles: Adding text and titles to your videos in Kinemaster is easy. Tap the “Layer” button and choose “Text.” Type the text you want to add, and it will appear on your video.
- Using Special Effects: Special effects can make your videos more interesting. To add an effect, tap the “Effect” button (star icon) and browse through the options. Kinemaster offers various effects like blurs, animations, and transitions.
How to Apply Filters and Colour Correction
To improve the look of your video, you can apply filters and color corrections. Tap the “Filter” button and select a filter you like. You can adjust the strength of the filter and see how it affects your video. For more precise color adjustments, tap the “Adjustment” button to change the brightness, contrast, saturation, and other color settings. This helps make your video look more polished.
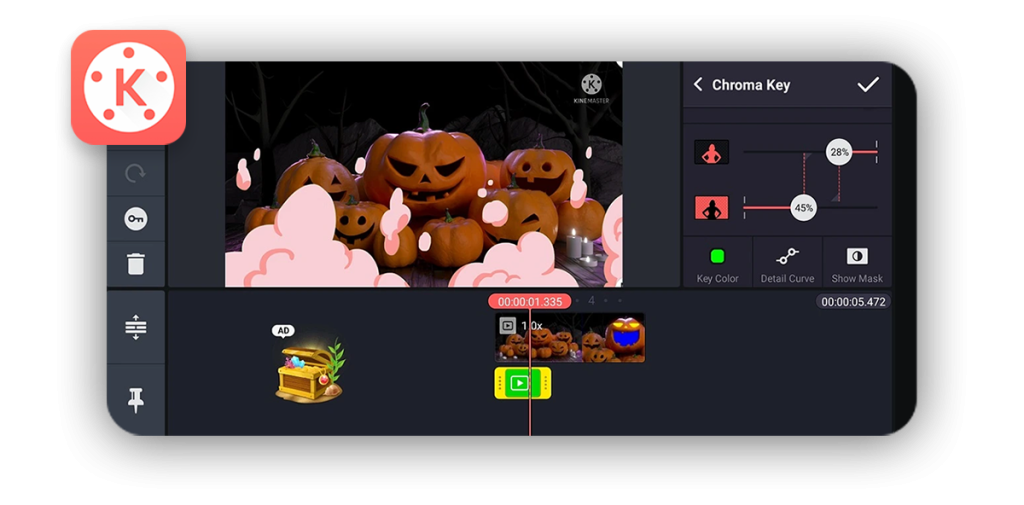
Using Green Screen (Chroma Key) Effect in Kinemaster
The green screen effect (Chroma Key) allows you to replace a solid color background with another image or video. To use this effect, import the video with the green screen background, then tap on the clip and select the “Chroma Key” option. Toggle it on, and Kinemaster will automatically remove the green color. You can then add a new background, like a photo or video, to replace the green screen.
How to Use the Multi-Layer Editing Feature
Multi-layer editing lets you work on multiple elements at once. To use this feature, tap the “Layer” button and add different video, audio, or image layers to your project. You can create a picture-in-picture effect, add overlays, or combine multiple videos on the screen at once. This feature gives you more flexibility and allows you to create more complex and engaging videos.
Exporting Your Video in HD Quality
Once you’re done editing, it’s time to export your video. Tap the export button (the arrow icon) at the top-right of the screen. You can choose the video resolution, such as 1080p (HD) or 4K, and set the frame rate (30fps or 60fps). After selecting your desired settings, tap “Export” to save your video. You can then share it directly to social media platforms like YouTube, Instagram, or save it to your device’s gallery.
Conclusion
Kinemaster is a powerful and easy-to-use video editing tool that can help you create professional-grade videos on your iOS device. With its multiple layers, advanced editing features, and high-quality output options, Kinemaster is perfect for content creators who want to produce impressive videos on the go. By following the steps outlined above, you can unlock the full potential of Kinemaster and take your editing skills to the next level. Happy editing!
Recommended For You